How to Install Google Analytics and Configure Enhanced E-commerce with Google Tag Manager
Watch the Video
Section titled “Watch the Video”Install Google Analytics with Google Tag Manager
Section titled “Install Google Analytics with Google Tag Manager”Create a Google Tag Manager Account and Container
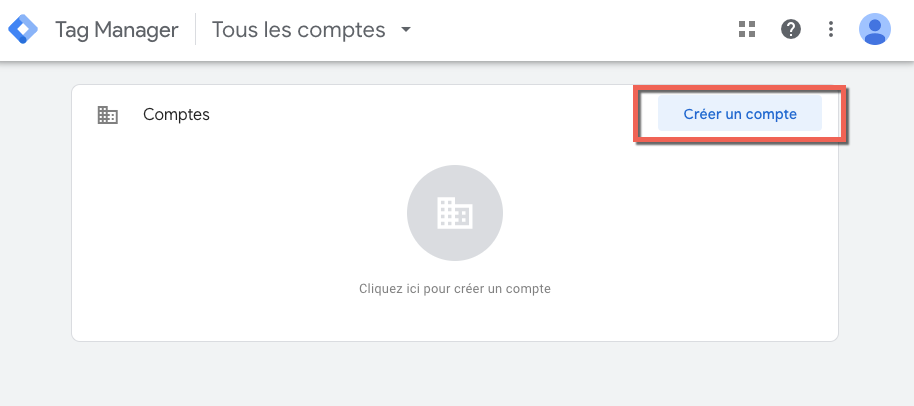
Section titled “Create a Google Tag Manager Account and Container”If you don’t already have a Google Tag Manager account, the first step is to create an account at the following address: https://tagmanager.google.com/. You must have a Google account to log in to the platform.
1 - In Google Tag Manager, click Create Account.
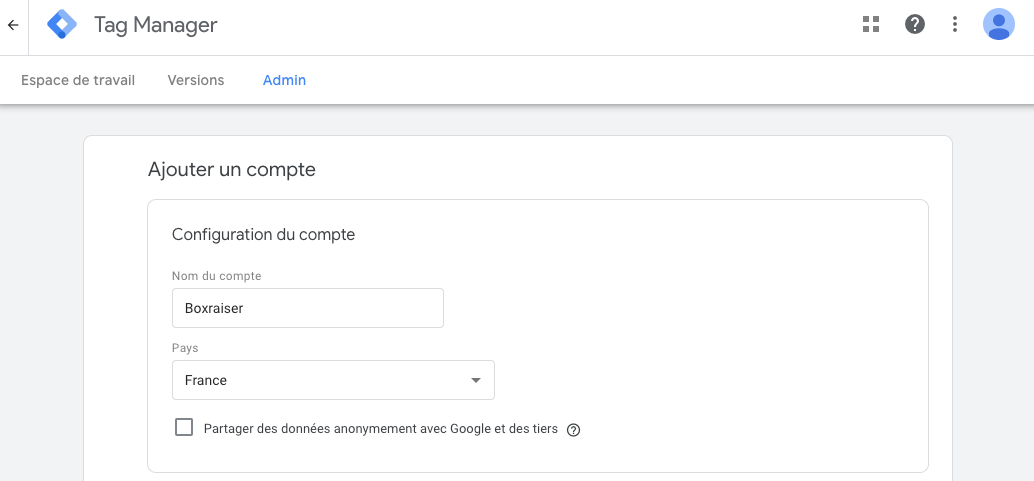
2 - In Account Setup, enter your company name as the account name, choose your country and optionally specify if you want to share anonymous data with Google and third parties.
3 - In Container Setup, enter a descriptive container name and select the Web content type. Finally, click on create.

4 - Review the terms of service and click Yes if you accept them.
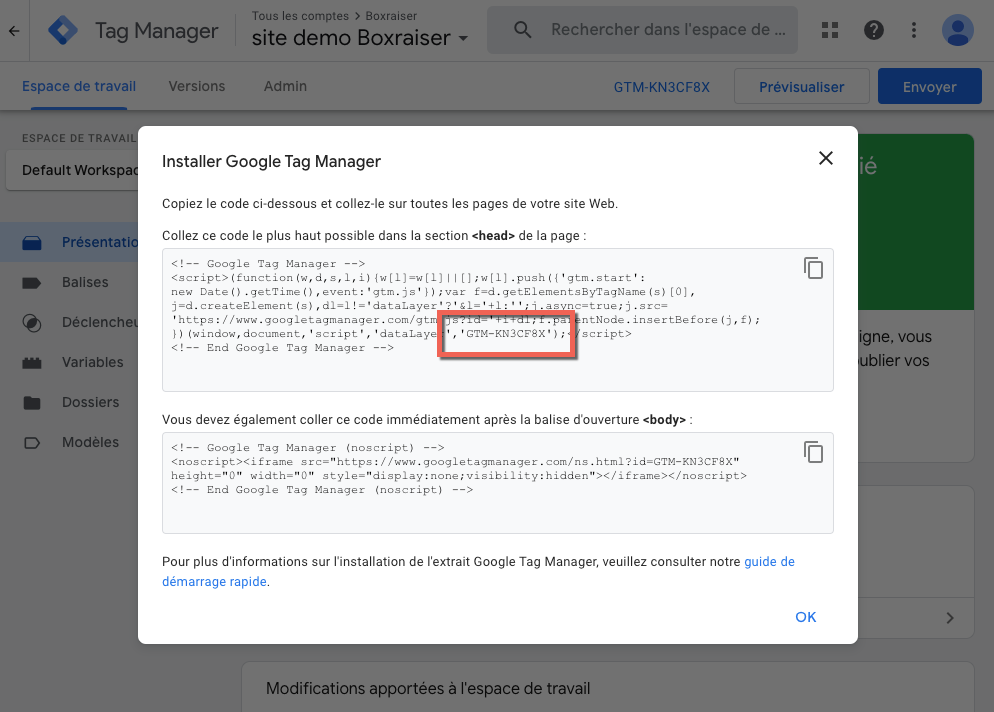
When your new container first loads, you will be prompted to install the web container code snippet.
To install Google Tag Manager on your site, simply copy the container ID (GTM-XXXX) into the dedicated field of your admin panel:
Configure Google Analytics Installation in Google Tag Manager
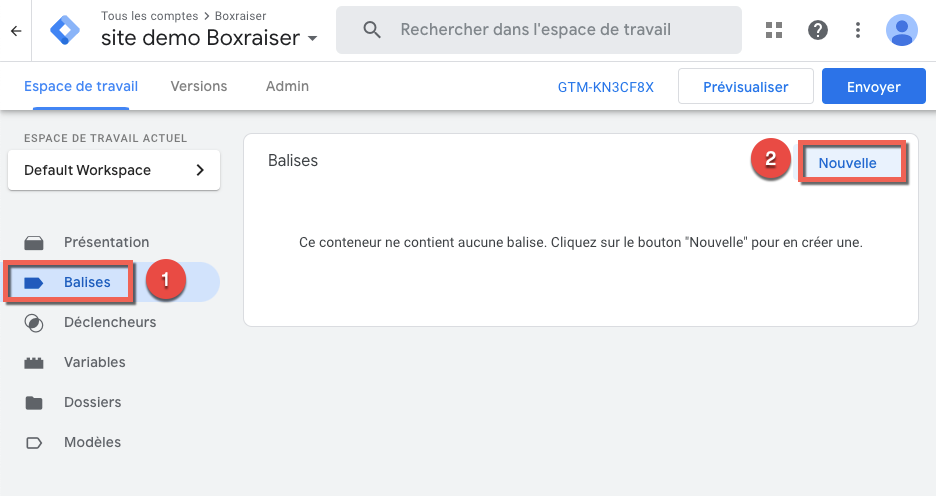
Section titled “Configure Google Analytics Installation in Google Tag Manager”1- From any page of your container, click on Tags > New.
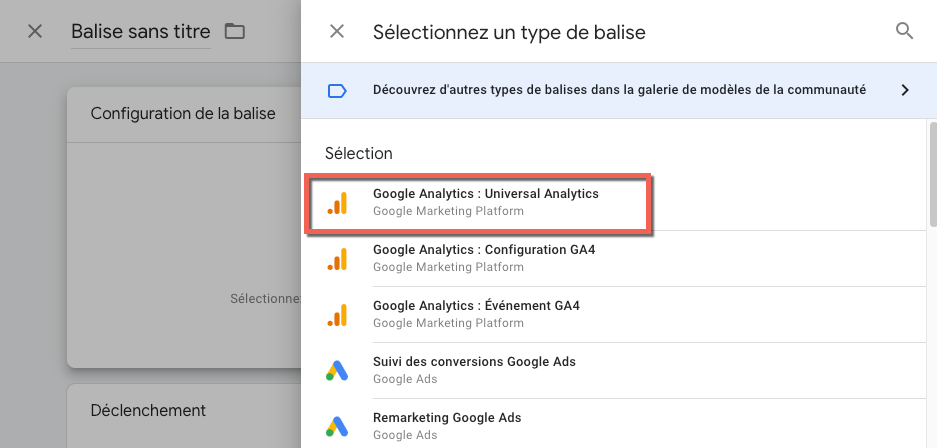
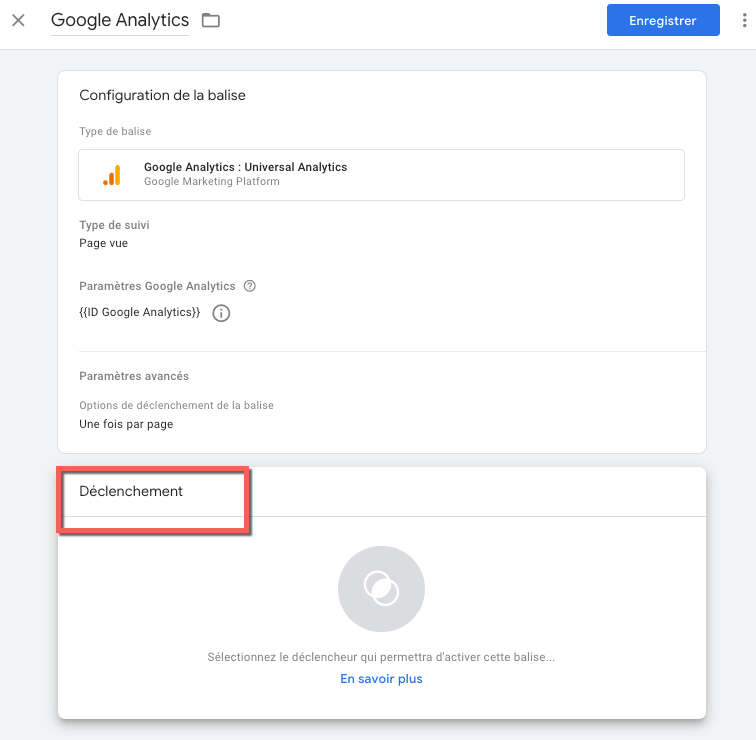
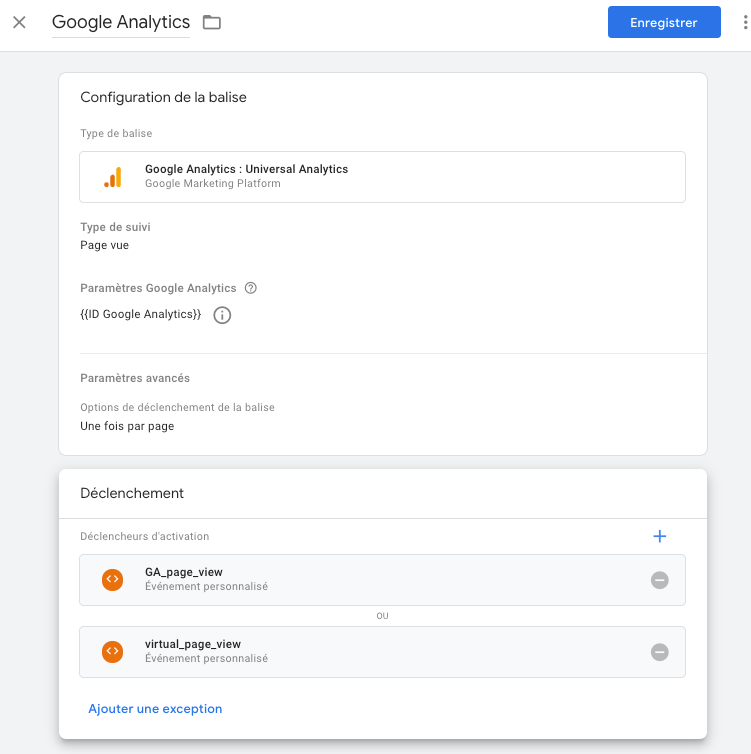
2 - The tag configuration page appears. Click on Tag Configuration and select Google Analytics: Universal Analytics.
3 - Select the “Page View” track type.
4 - In Google Analytics Settings, select new variable.
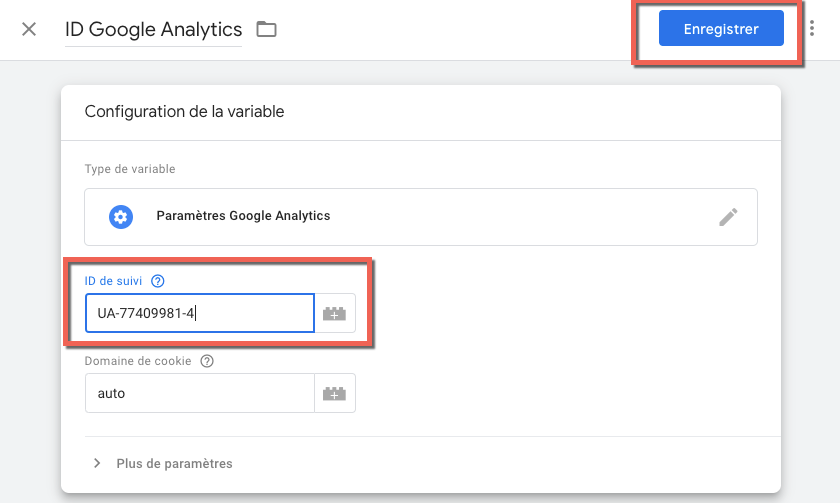
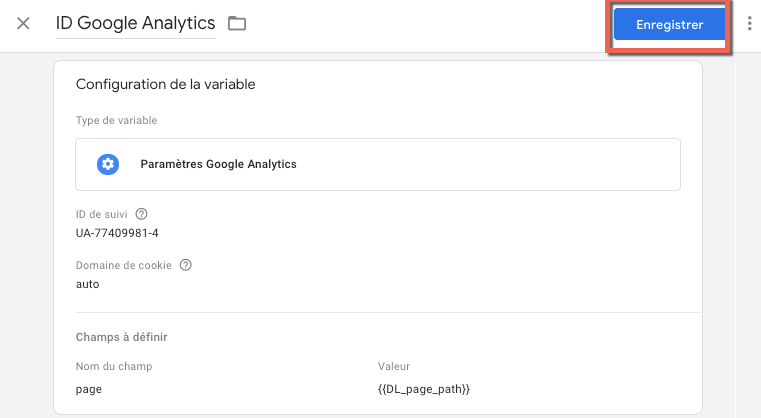
5 - The variable configuration page appears. Name your variable (here, “Google Analytics ID”).
6 - Enter your Google Analytics ID in the Tracking ID field.
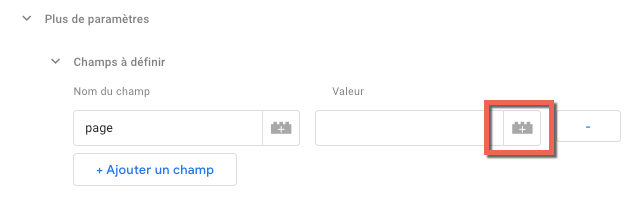
7 - Click on More Settings > Fields to Set then add > + Add a Field
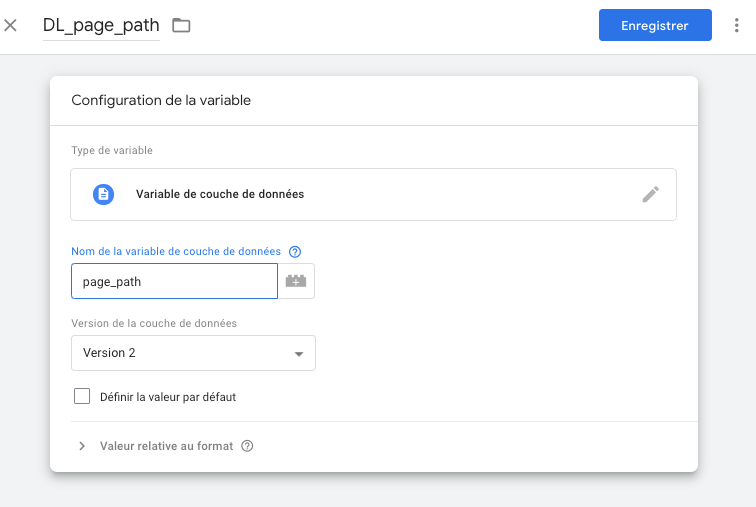
8 - In Field Name enter exactly “page” then in value click on the brick icon to create a new variable.
9 - Once the Select a Variable window is open, click on the + icon in the top right corner
10 - Name your variable DL_page_path
11- In the Data Layer Variable Name field, enter exactly “page_path”
12 - Click on Save
13 - Click on Save a second time to create your variable.
14 - Click on Triggering to choose the trigger that will activate the tag
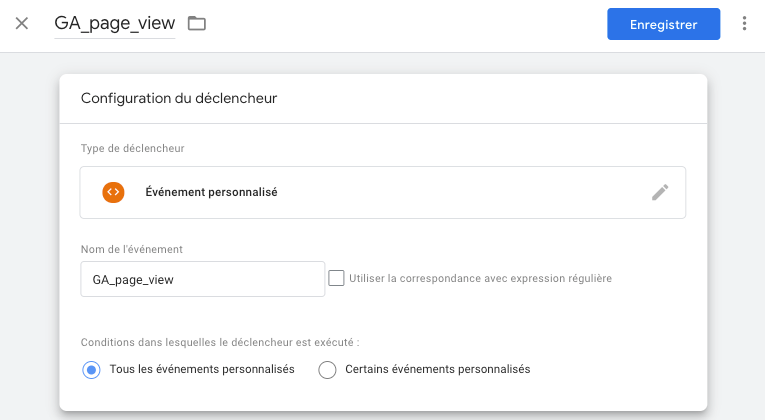
15 - Once the Choose a Trigger window is open, click on the + icon in the top right corner
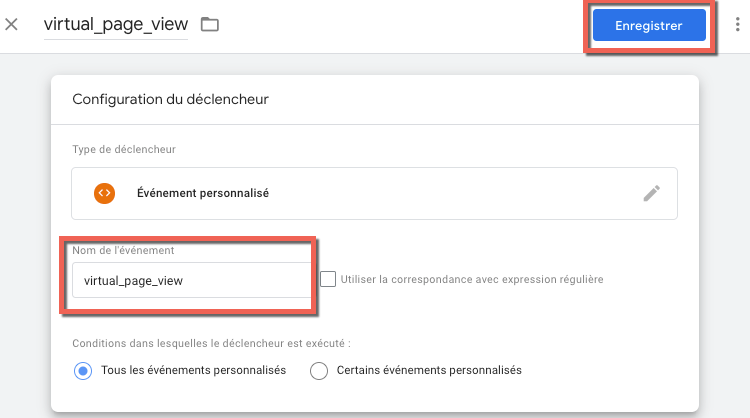
16 - Name your trigger GA_page_view, click on trigger configuration and select the Custom Event trigger type.
17 - Once the trigger is selected, enter exactly the following value in the Event Name field: GA_page_view. Click on Save
18 - Click on the + icon in the top right corner of the Trigger window to add a second trigger.
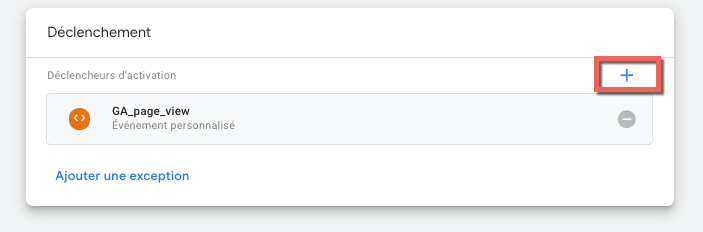
19- Click on the + icon in the top right corner of your window to create a new trigger.
20 - Name your trigger virtual_page_view, click on trigger configuration and select the Custom Event trigger type.
21 - Once the trigger is selected, enter exactly the following value in the Event Name field: virtual_page_view. Click on Save
22 - Your Google Analytics tag is finalized, click on Save
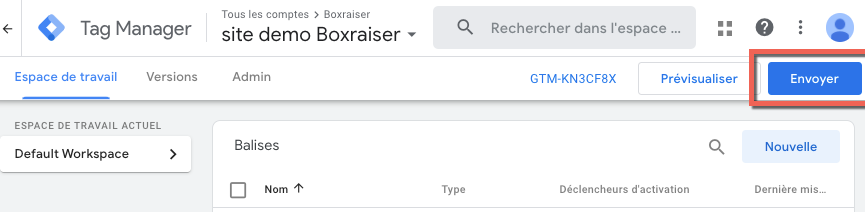
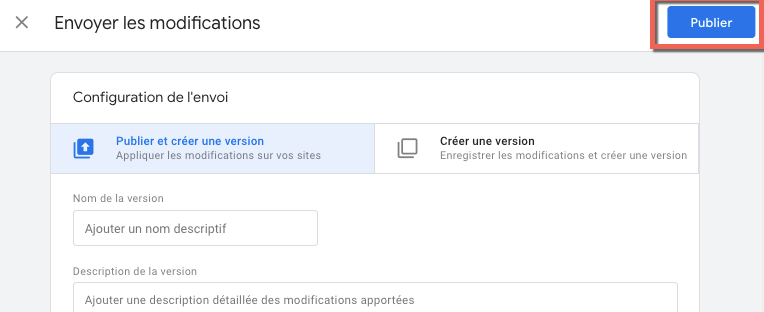
23 - From the workspace, click Submit then Publish
Configure Event Measurement
Section titled “Configure Event Measurement”Creating the actionValue Variable
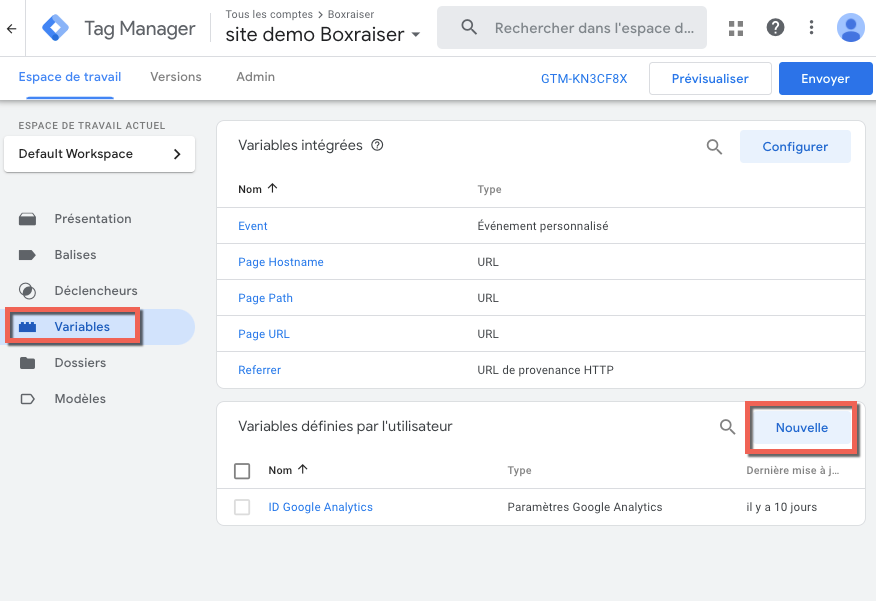
Section titled “Creating the actionValue Variable”1 - Click on Variables then in the User-Defined Variables window, click on New
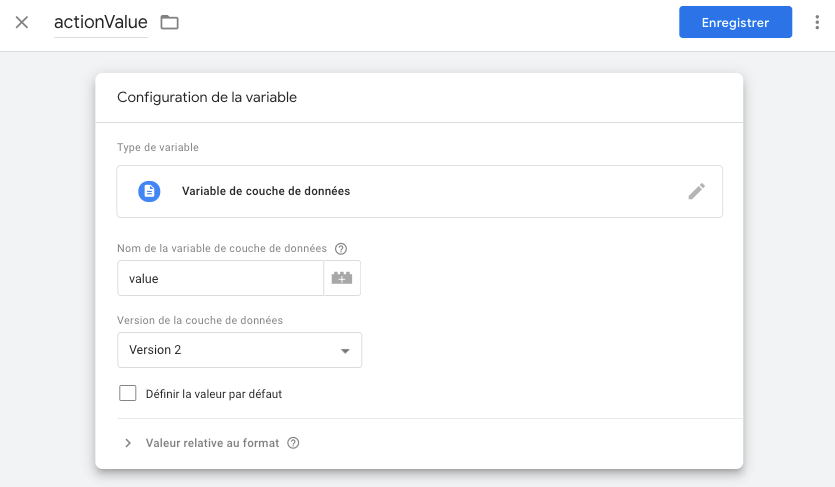
2 - Name your variable actionValue
3 - Click on Variable Configuration and click on Data Layer Variable
4 - In the Data Layer Variable Name field enter exactly: value
5 - Click on Save
Creating the GA event - action Tag
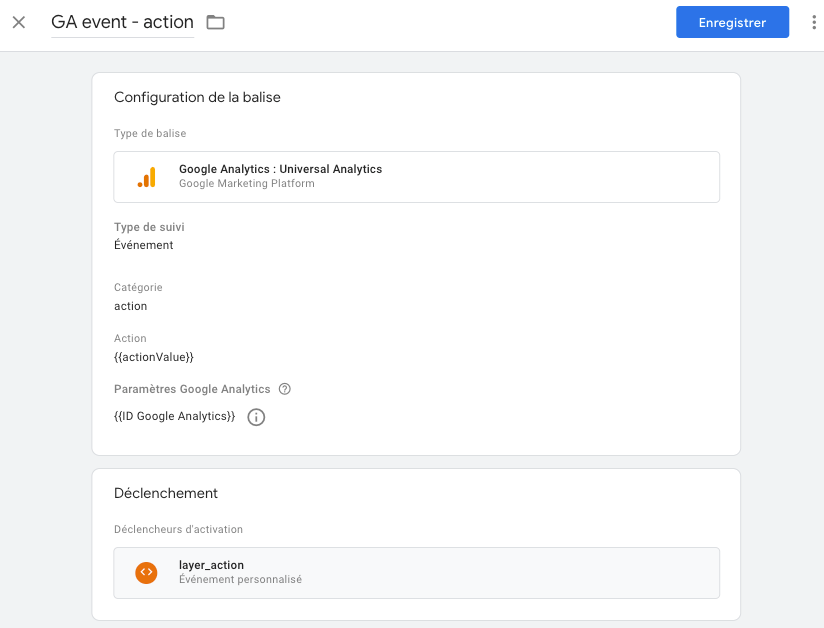
Section titled “Creating the GA event - action Tag”1 - Click on Tags then New.
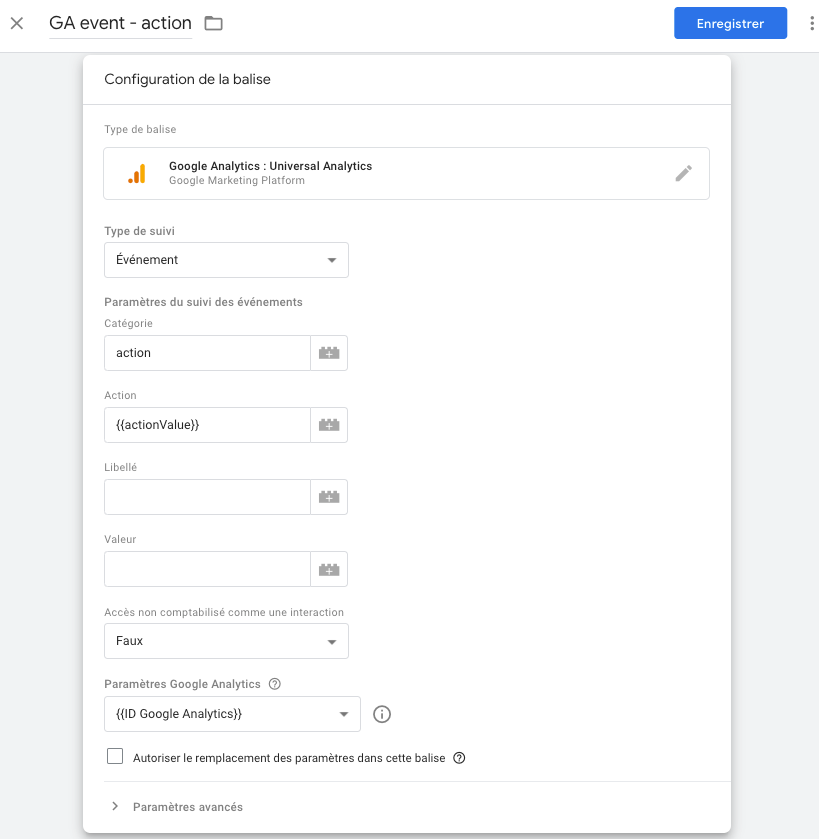
2 - Name your tag GA event - action
2 - Click on Tag Configuration then Google Analytics: Universal Analytics.
3 - Set Track Type to Event.
4 - Configure the Event Tracking Parameters section as follows:
Category: action
Action: {actionValue}
For the action, enter exactly the value above (brackets included) or click on the brick icon and select the actionValue variable
5 - In Google Analytics Settings: select your existing “Google Analytics ID” variable.
6 - Click on Triggering and click on the + icon in the top right corner of your window to create a new trigger.
8 - Assign the name layer_action to your trigger. Click on Trigger Configuration and select the Custom Event trigger type
9 - In Event Name, enter exactly layer_action.
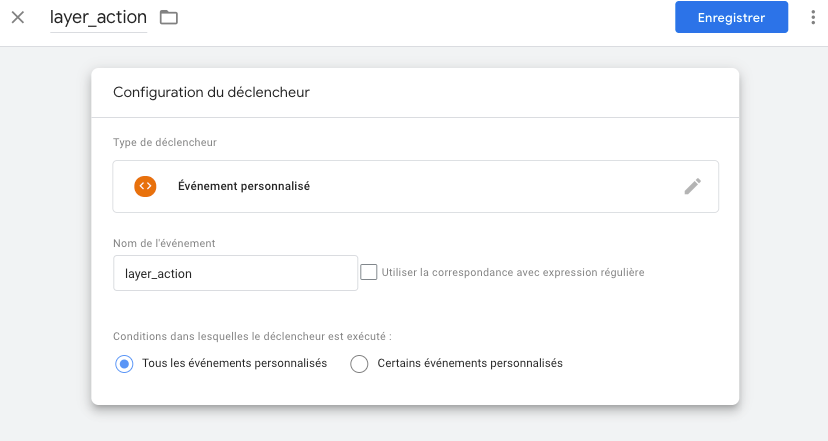
10 - Click on Save to save your trigger
11- Your tag is finalized, click on Save
12 - Click on Submit and Publish the container.
Configure E-commerce Measurement
Section titled “Configure E-commerce Measurement”Enable Enhanced E-commerce Measurement in Google Analytics
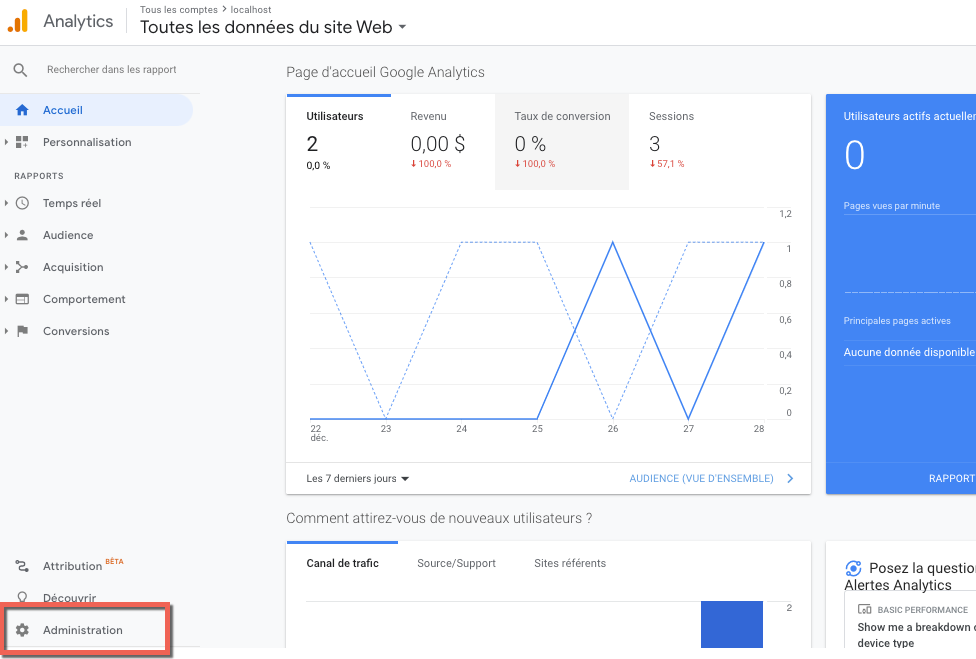
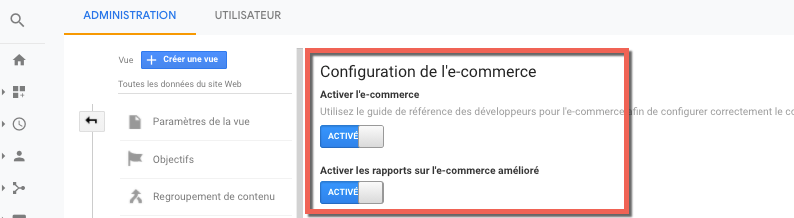
Section titled “Enable Enhanced E-commerce Measurement in Google Analytics”1 - In Google Analytics, go to the Administration section of Google Analytics
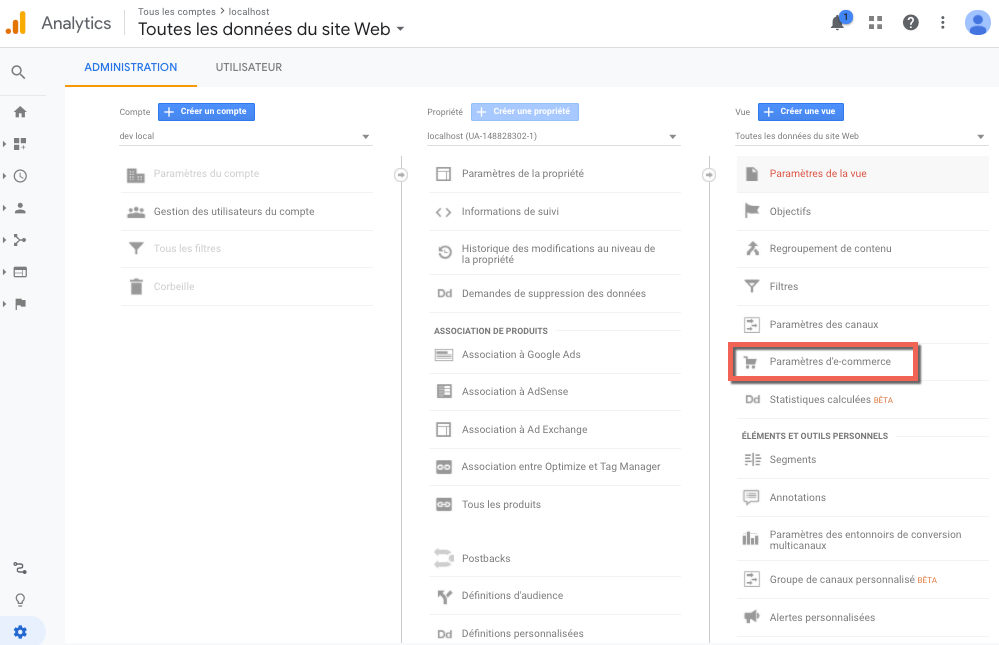
2 - In your View column click on E-commerce Settings
3 - Enable e-commerce as well as enhanced e-commerce reporting
Add to Cart
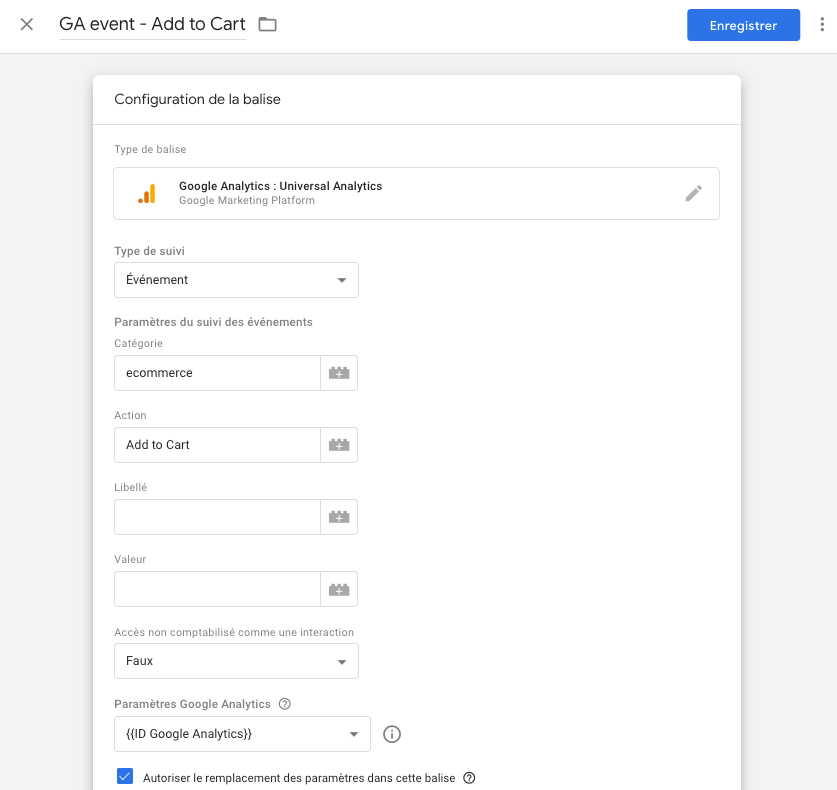
Section titled “Add to Cart”1 - Click on Tags then New.
2- Name your tag GA event - Add to Cart
2 - Click on Tag Configuration then Google Analytics: Universal Analytics.
3 - Set Track Type to Event.
4 - Configure the Event Tracking Parameters section as follows:
Category: ecommerce
Action: Add to Cart
5 - In Google Analytics Settings: select your existing “Google Analytics ID” variable and check Enable overriding settings in this tag
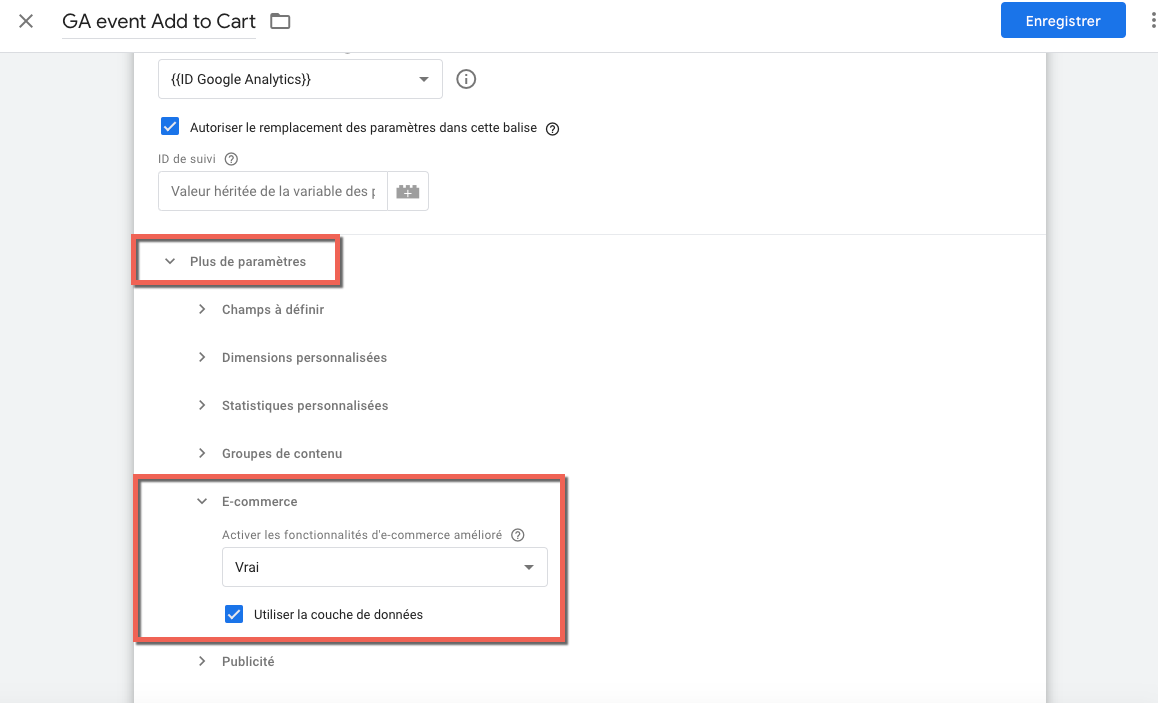
6 - In more settings, select E-commerce. In Enable Enhanced Ecommerce Features select True then check use data layer.
7 - Click on Triggering and click on the + icon in the top right corner of your window to create a new trigger.
8 - Assign the name addToCart to your trigger. Click on Trigger Configuration and select the Custom Event trigger type
9 - In Event Name, enter exactly addToCart.

10 - Click on Save to save your trigger
11- Your tag is finalized, click on Save
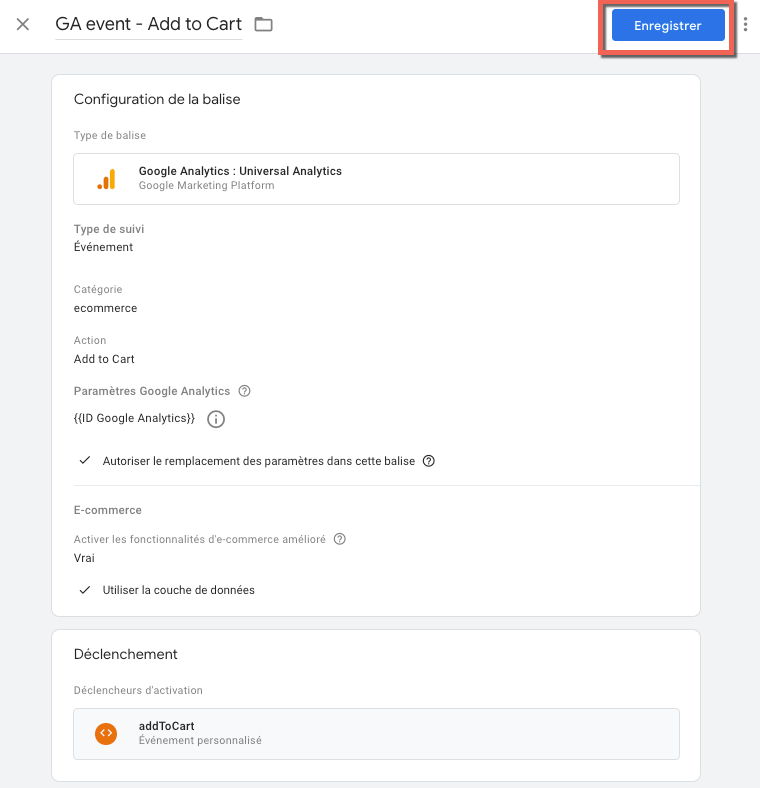
12 - Click on Submit and Publish the container
Remove from Cart
Section titled “Remove from Cart”1 - Click on Tags then New.
2- Name your tag GA event - Remove from Cart
2 - Click on Tag Configuration then Google Analytics: Universal Analytics.
3 - Set Track Type to Event.
4 - Configure the Event Tracking Parameters section as follows:
Category: ecommerce
Action: Remove from Cart
5 - In Google Analytics Settings: select your existing “Google Analytics ID” variable and check Enable overriding settings in this tag
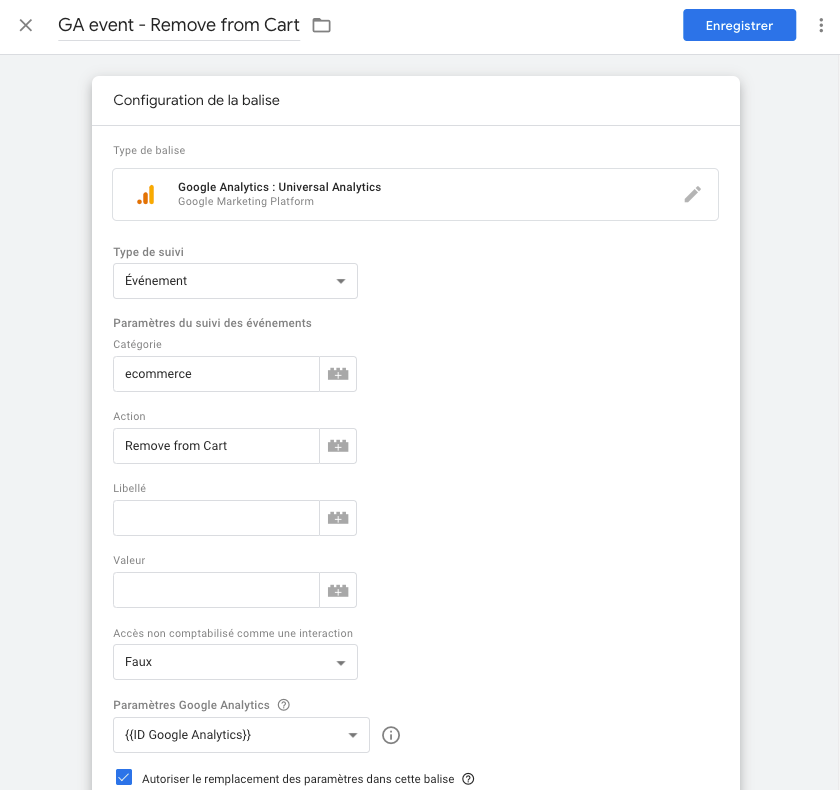
6 - In more settings, select E-commerce. In Enable Enhanced Ecommerce Features select True then check use data layer.
png)
7 - Click on Triggering and click on the + icon in the top right corner of your window to create a new trigger.
8 - Assign the name removeFromCart to your trigger. Click on Trigger Configuration and select the Custom Event trigger type
9 - In Event Name, enter exactly removeFromCart.
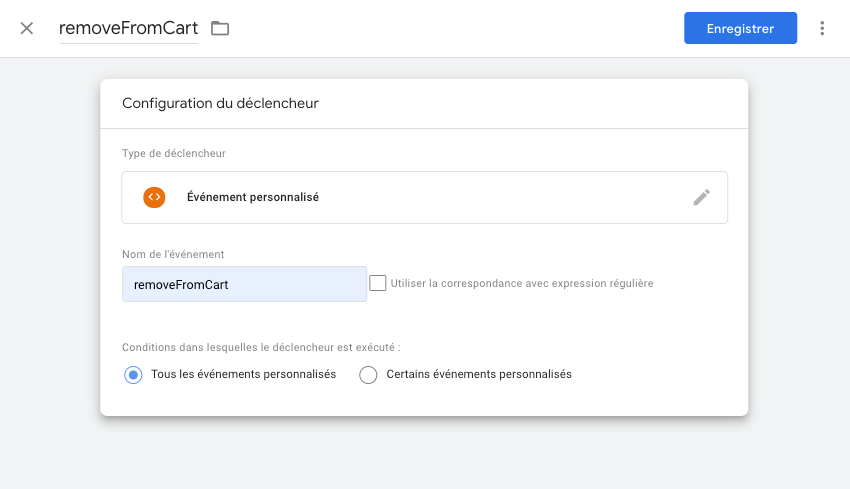
10 - Click on Save to save your trigger
11- Your tag is finalized, click on Save
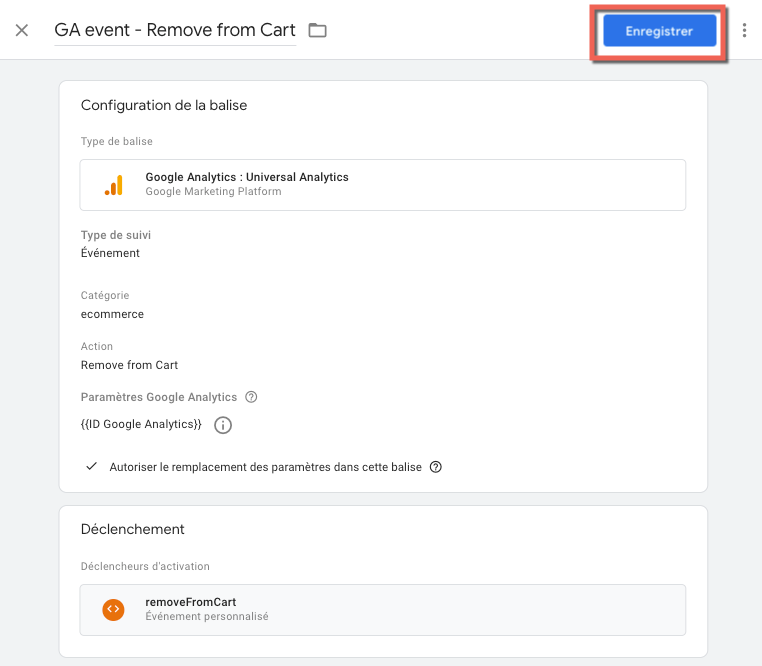
12 - Click on Submit and Publish the container.
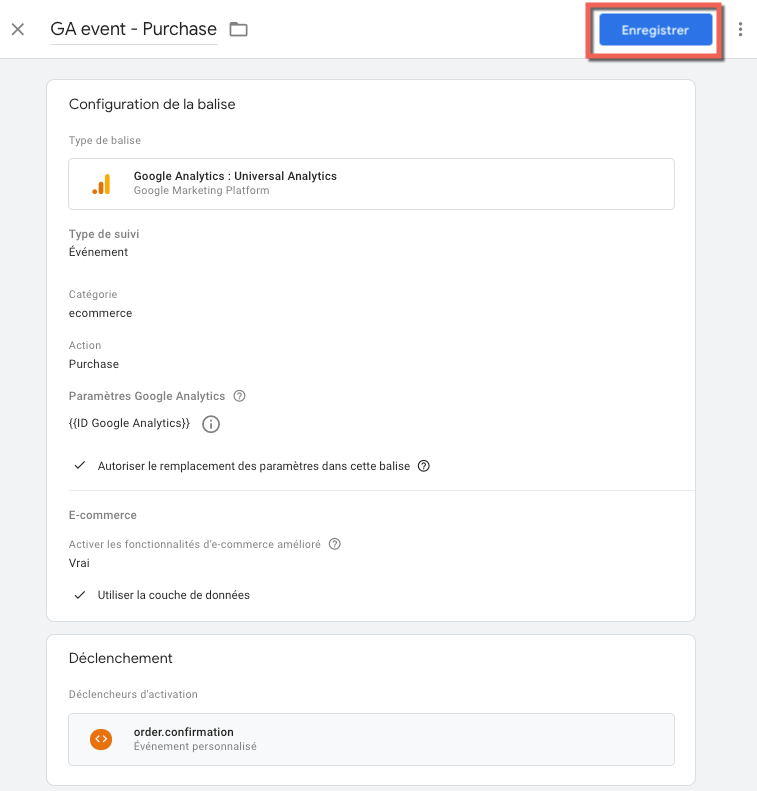
Purchase
Section titled “Purchase”1 - Click on Tags then New.
2- Name your tag GA event - Purchase
2 - Click on Tag Configuration then Google Analytics: Universal Analytics.
3 - Set Track Type to Event.
4 - Configure the Event Tracking Parameters section as follows:
Category: ecommerce
Action: purchase
5 - In Google Analytics Settings: select your existing “Google Analytics ID” variable and check Enable overriding settings in this tag
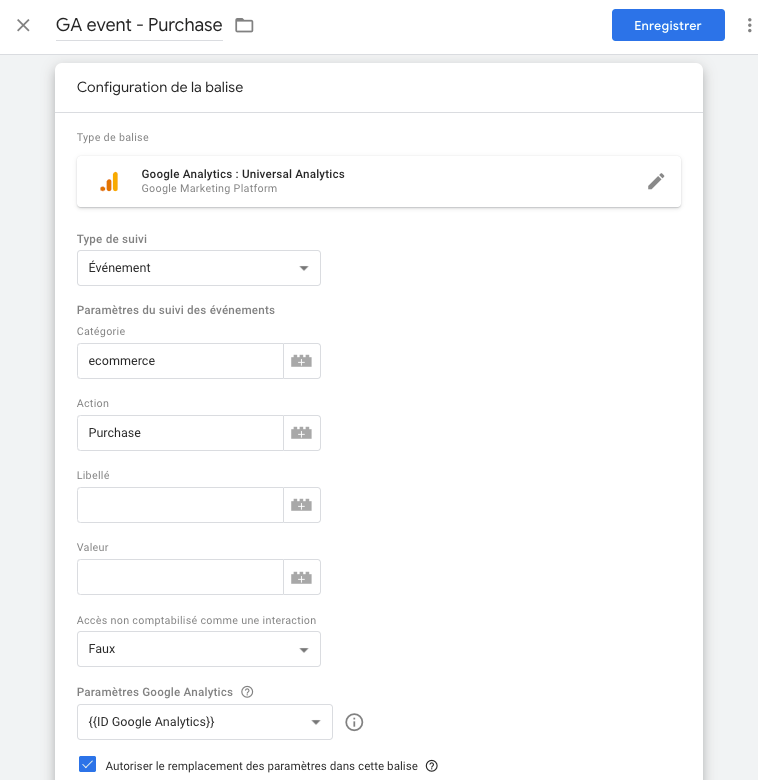
6 - In more settings, select E-commerce. In Enable Enhanced Ecommerce Features select True then check use data layer.
png)
7 - Click on Triggering and click on the + icon in the top right corner of your window to create a new trigger.
8 - Assign the name order.confirmation to your trigger. Click on Trigger Configuration and select the Custom Event trigger type
9 - In Event Name, enter exactly order.confirmation.
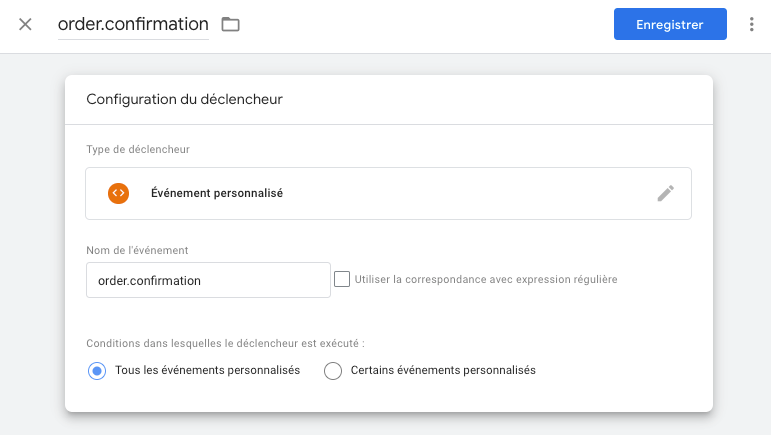
10 - Click on Save to save your trigger
11- Your tag is finalized, click on Save
12 - Click on Submit and Publish the container.
Checkout Steps
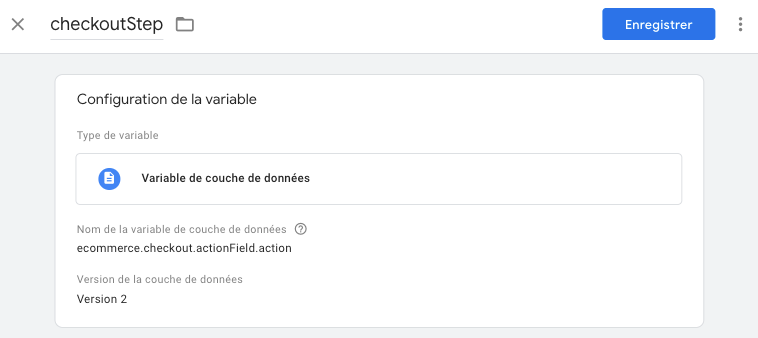
Section titled “Checkout Steps”Creating the checkoutStep Variable
Section titled “Creating the checkoutStep Variable”1 - Click on Variables then in the User-Defined Variables window, click on New
png)
2 - Name your variable checkoutStep
3 - Click on Variable Configuration and click on Data Layer Variable
4 - In the Data Layer Variable Name field enter exactly: ecommerce.checkout.actionField.action
5 - Click on Save
Creating the GA event - Checkout Tag
Section titled “Creating the GA event - Checkout Tag”1 - Click on Tags then New.
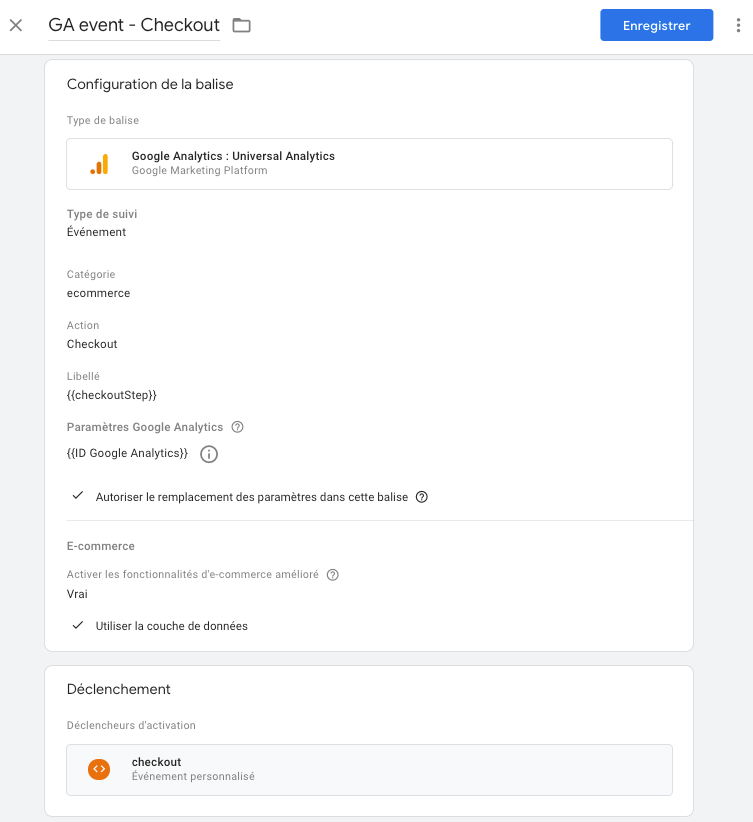
2 - Name your tag GA event - Checkout Option
2 - Click on Tag Configuration then Google Analytics: Universal Analytics.
3 - Set Track Type to Event.
4 - Configure the Event Tracking Parameters section as follows:
Category: ecommerce
Action: Checkout
Label: {checkoutStep}
For the label, enter exactly the value above (brackets included) or click on the brick icon and select the checkoutStep variable
5 - In Google Analytics Settings: select your existing “Google Analytics ID” variable and check Enable overriding settings in this tag
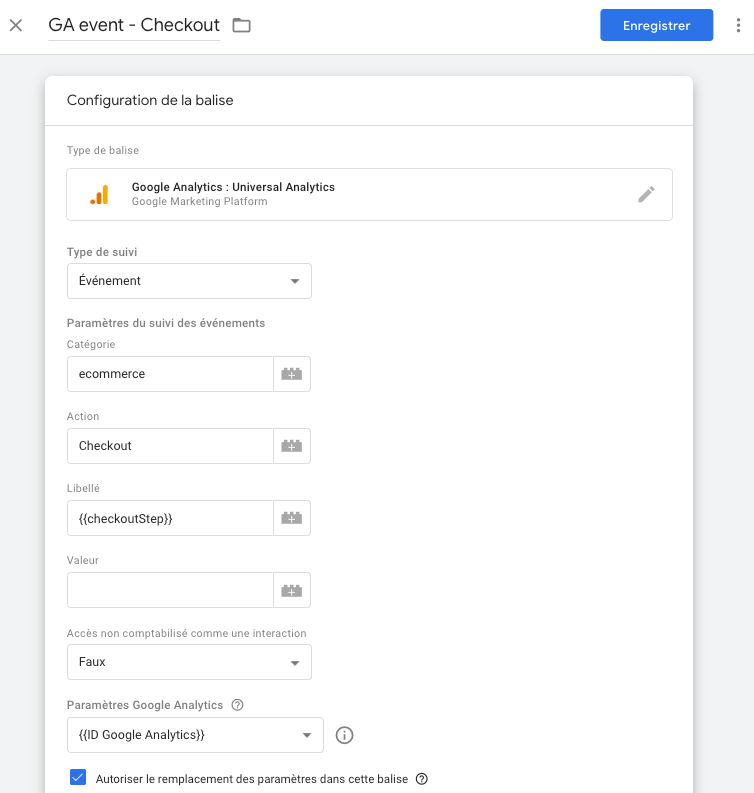
6 - In more settings, select E-commerce. In Enable Enhanced Ecommerce Features select True then check use data layer.
png)
7 - Click on Triggering and click on the + icon in the top right corner of your window to create a new trigger.
8 - Assign the name checkout to your trigger. Click on Trigger Configuration and select the Custom Event trigger type
9 - In Event Name, enter exactly checkout.
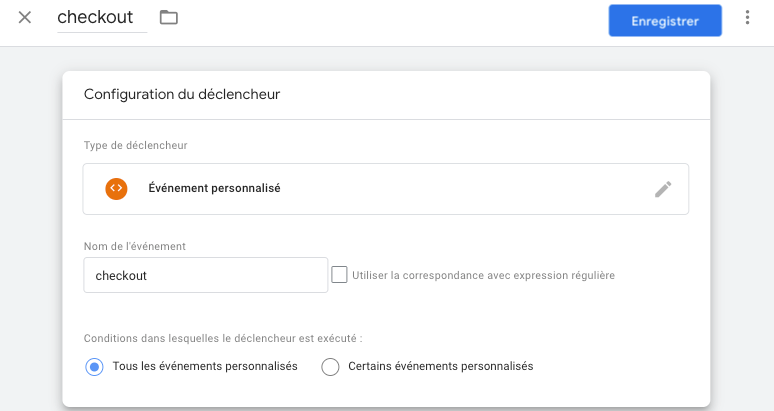
10 - Click on Save to save your trigger
11- Your tag is finalized, click on Save
12 - Click on Submit and Publish the container.
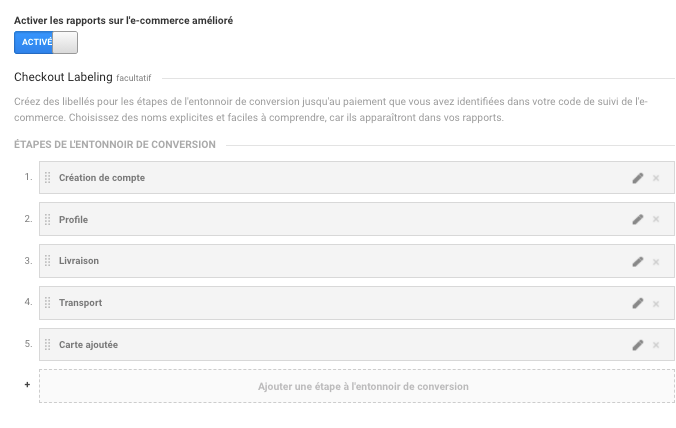
Creating the Purchase Funnel in Google Analytics
Section titled “Creating the Purchase Funnel in Google Analytics”1 - To configure the names of purchase journey steps in Google Analytics, go to the Administration section of Google Analytics
png)
2 - In your View column click on E-commerce Settings
png)
3 - Click on Add funnel step and configure the steps as shown below: