
Install the Ciklik module
Key points
The Ciklik module for PrestaShop works with PrestaShop 1.7.7 to 9.2, so with PrestaShop 8 and PrestaShop 9, and with PHP 7.2 to 8.4. You download it from the releases of Ciklik’s GitHub repository: pick the ciklik-raw-… file that matches your server’s PHP version. Before installing, create your Ciklik account and your PrestaShop space to get the API token you enter in the module. Your shop must answer Ciklik over HTTPS, without a password or a redirect, on the /api and /ciklik/gateway paths.
Create Your Ciklik Account and PrestaShop Space
Section titled “Create Your Ciklik Account and PrestaShop Space”Access the Ciklik Application
Section titled “Access the Ciklik Application”-
Open the link below to connect to the application for the first time:
-
Create your Ciklik account by completing the online form.
-
Make sure to enter a valid phone number: a code will be sent to you by SMS to validate your account.
Once your account is validated, you are connected to the Ciklik application.
Create Your PrestaShop Space
Section titled “Create Your PrestaShop Space”To retrieve your Ciklik API key and then activate your PrestaShop module, you need to create your PrestaShop space in Ciklik.
Go to the link below and complete the form:
https://app.ciklik.co/app/prestashop
The required information is:
- shop name: name of the PrestaShop store
- domain name for the module: domain name of your site
- PSP: payment service provider such as our partner Payplug
- PSP API key: this is the live secret key of your PSP
Regarding your company, the required information is:
- company name
- SIRET (business registration number)
- address and phone number
- acceptance of Terms and Conditions
If the Test box is checked, the domain information is ignored, a test environment is deployed, and the billing information is not used.
Otherwise, to validate the form and create your PrestaShop space, we require payment of the first monthly fee by credit card. You can then modify your payment information if needed or switch to a SEPA mandate.
Retrieve Your API Key
Section titled “Retrieve Your API Key”We will send you your API key to connect the PrestaShop module to Ciklik.
Apply DNS Changes
Section titled “Apply DNS Changes”You will receive an email instructing you to add 5 DNS records to the DNS zone of your domain: email signature (DKIM), subscription space (A), sending authorization (SPF), email tracking (CNAME) and DMARC. They apply to the subscription subdomain created for you (abo. followed by your domain). The same values are shown in the My installation section.
This allows us to finalize your PrestaShop space on the Ciklik application and subsequently ensure proper deliverability of transactional emails related to subscriptions to your customers.
Prepare Your Shop
Section titled “Prepare Your Shop”Ciklik calls your shop from its servers, without a browser, to read carts and send orders. These calls use two paths:
/api: the PrestaShop webservice/ciklik/gateway: the Ciklik module gateway
Both paths must answer over HTTPS, without a password and without a redirect.
No Password During Installation
Section titled “No Password During Installation”During installation, your shop must not be protected by a password, such as the one of an .htaccess file on a pre-production shop: Ciklik cannot type it.
If your pre-production shop must stay protected, ask your hosting provider to allow Ciklik’s addresses. You will find them in your Ciklik space, My installation section.
Firewall and Maintenance Mode
Section titled “Firewall and Maintenance Mode”A firewall, a WAF or PrestaShop maintenance mode also block Ciklik’s calls. The settings to plan for are described in Rebill and PrestaShop site unavailability.
Check That Ciklik Can Reach Your Shop
Section titled “Check That Ciklik Can Reach Your Shop”In the Ciklik application, My installation section, the Ciklik can reach your shop line turns to Verified within ten minutes of the fix. Until then, it shows the cause found: password, firewall refusal, maintenance, redirect or certificate.
Install the Ciklik Module
Section titled “Install the Ciklik Module”The module works with PrestaShop 1.7.7 to 9.2 and PHP 7.2 to 8.4.
| PrestaShop version | Supported | Good to know |
|---|---|---|
| 1.7.7 | Yes | New frequencies created in the database; other payment methods hidden through a theme change (see Configure the subscription) |
| 8 | Yes | New frequencies created in Attributes; other payment methods hidden automatically |
| 9, up to 9.2 | Yes | Same as PrestaShop 8 |
The file to download depends on your server’s PHP version:
| Server PHP version | File to download |
|---|---|
| 7.2 | ciklik-raw-7.2.zip |
| 7.3 | ciklik-raw-7.3.zip |
| 7.4 | ciklik-raw-7.4.zip |
| 8.0 | ciklik-raw-8.zip |
| 8.1 | ciklik-raw-8.1.zip |
| 8.2 | ciklik-raw-8.2.zip |
| 8.3 | ciklik-raw-8.3.zip |
| 8.4 | ciklik-raw-8.4.zip |
-
Download the Ciklik module. In the latest release, open Assets and download the
ciklik-raw-<PHP version>.zipfile matching your server’s PHP version: for exampleciklik-raw-8.2.zipfor PHP 8.2. For PHP 8.0, the file is namedciklik-raw-8.zip.The
ciklik-with-addon-…files are meant for the PrestaShop Addons marketplace: they also require the PrestaShop Account and EventBus modules. Do not use them for an installation from GitHub. -
In the PrestaShop back office, go to Modules > Module Manager.
-
Click Upload a module and select the zip file.
-
Once the module is installed, click Configure.
Configure the Module
Section titled “Configure the Module”Fill out the form by completing the fields below:
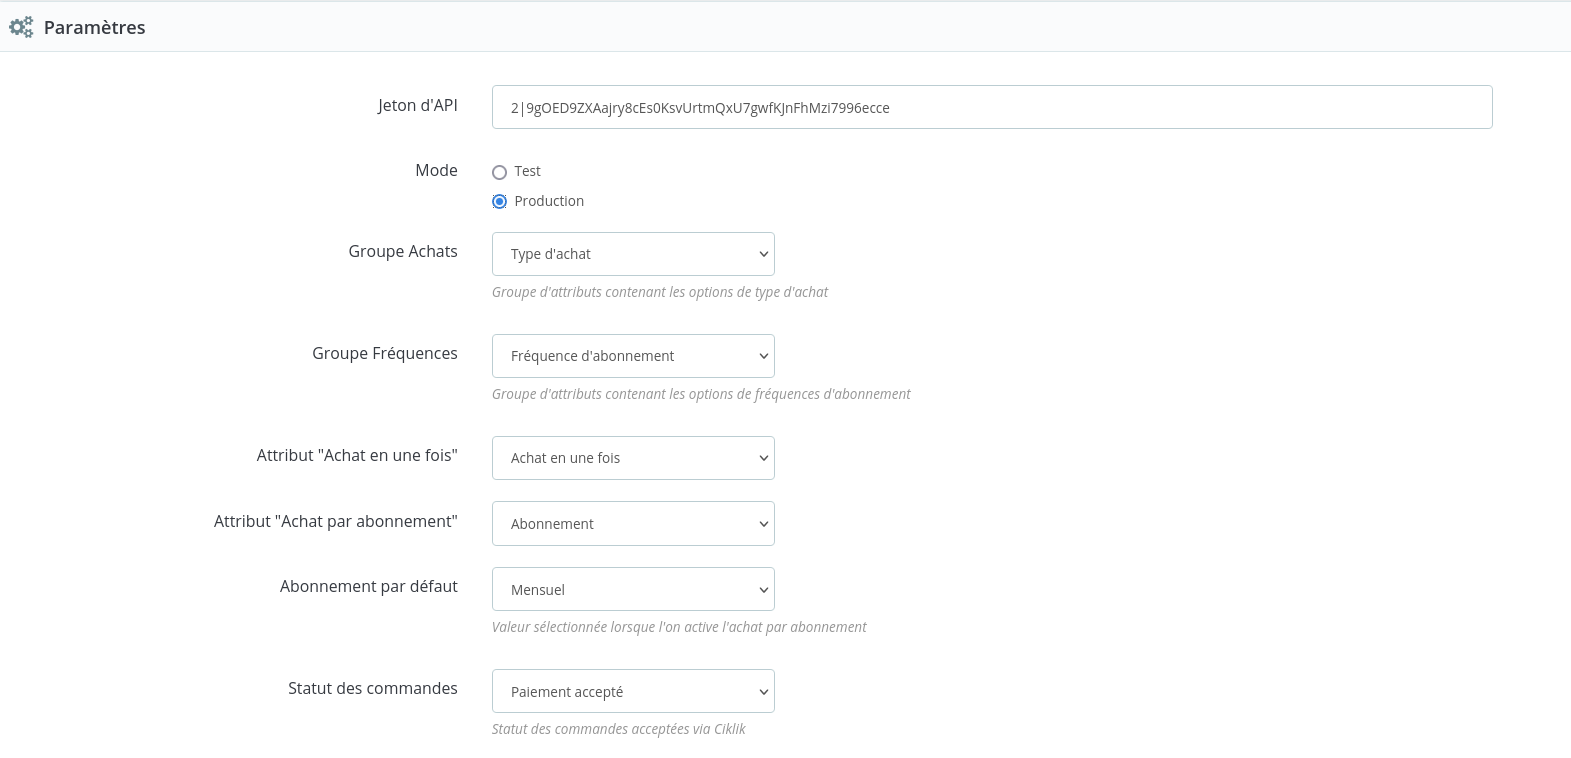
Screenshot from an earlier module version: the Mode field still shows Test and Production.
- API Token: enter the Ciklik API key (the one obtained after creating your PrestaShop space in Ciklik)
- Mode: keep Production/Dev/Test (even if you are working on a pre-production environment). The other value, Demo, is reserved for demonstrations
- Purchase type group: select “Type d’achat”
- Frequencies group: select “Fréquence d’abonnement”
Subscription frequencies to apply to products of your choice are already created when the module is installed (Mensuel, then every 2, 3, 4, 6, 8, 10 and 12 months). You can add more once the module is installed.
- Order status: status given to orders accepted through Ciklik, first order and renewals. We recommend Remote payment accepted.
If no order status is available or if it is not available, you can go to the Orders > Order Manager section and check the settings of the order status you choose during module installation: the module list only offers statuses that consider the order as paid and generate an invoice.
-
Enable specific status for subscription creation and Subscription creation order status (off by default): give another status to the first order of a subscription, for example to spot it or handle it separately in your logistics. Renewals keep the Order status above. Unless you have a specific need, leave this option off.
-
Enable debug logs: leave on No
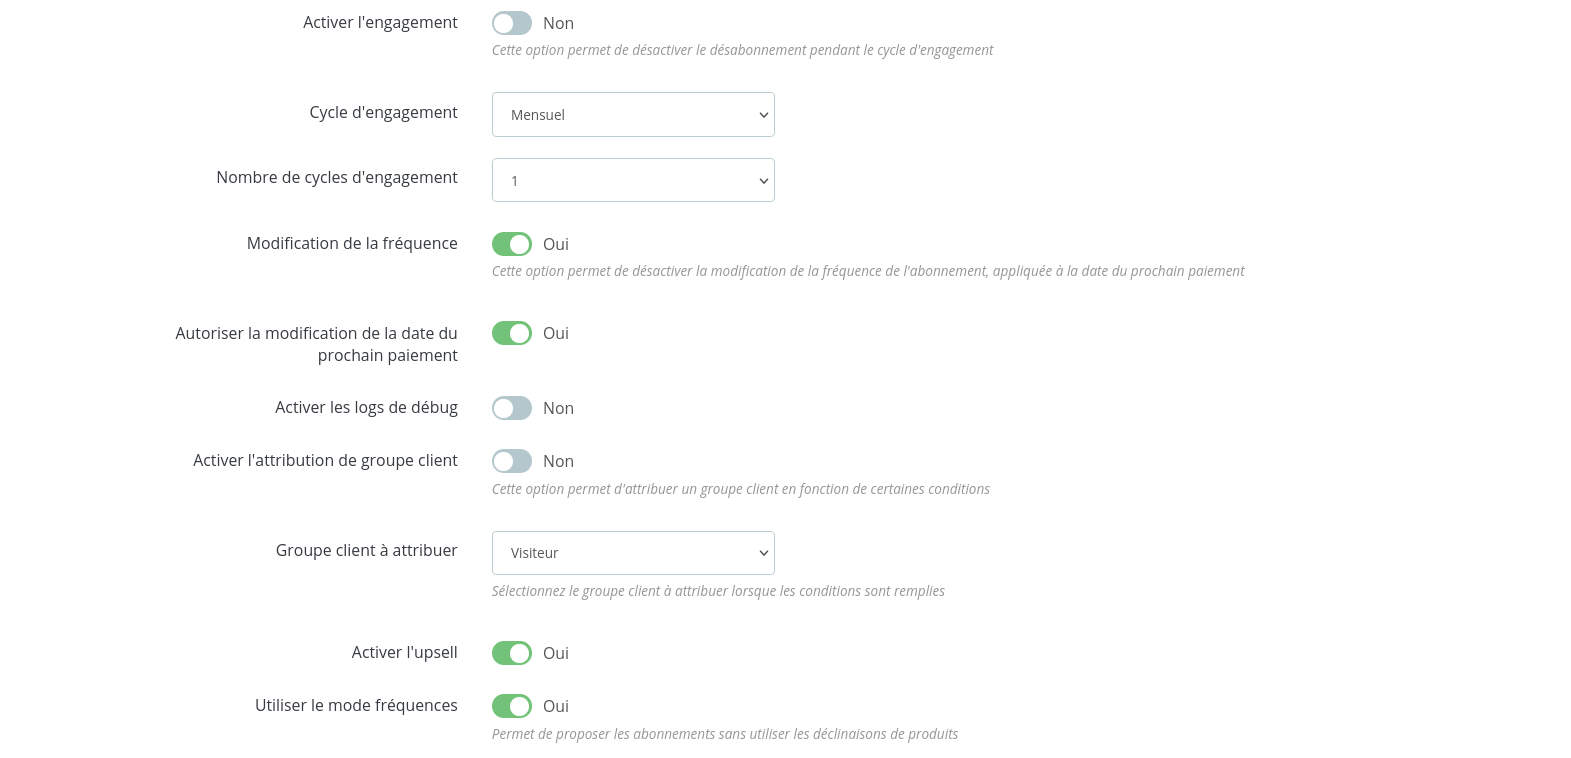
Screenshot from an earlier interface version: newer options, such as skipping the next delivery, are not shown yet.
This section allows you to enable certain module options:
- Enable commitment, Commitment cycle and Number of commitment cycles: if you want to prevent a subscriber from canceling their subscription for a given period after subscribing.
- Frequency modification: the subscriber can change the frequency of their subscription from their account (see Change the frequency of a subscription).
- Allow next payment date modification: the subscriber can move their next order earlier or later (see Reschedule the next order date).
- Allow skipping the next delivery: the subscriber can postpone their next delivery by one cycle, without canceling (see Skip the next delivery).
- Enable customer group assignment and Customer group to assign: see Manage your subscribers in a PrestaShop customer group.
- Enable upsell: see Add a product to your next order (upsell).
- Require subscription consent at checkout: a mandatory checkbox at the payment step makes the customer acknowledge the automatic renewal (see Require subscription consent).
- Fall back to default combination if deleted: at renewal, a deleted combination is replaced by the product’s default combination, in frequency mode only (see PrestaShop API error messages).
Generate a New API Token
Section titled “Generate a New API Token”A token is provided when your Ciklik account is created. It is shown only once: if you did not keep it, generate a new one.
-
Log in to your Ciklik account, click on Sites at the bottom of the left column (Settings section), then on the small eye icon (view) next to your site.
-
In the actions menu (the three dots at the top right), choose Create an API token, give it a name that says what it is for (PrestaShop module, agency, integration) and confirm.
-
You land on the token page: the Token (shown only once) field holds the value to paste into the module configuration. Copy it right away, it will never be shown again.
Your tokens are listed at the bottom of your site sheet, API tokens section, with their last use date. You can delete a token there: the module using it loses access immediately.
Frequently asked questions
Is the Ciklik module compatible with PrestaShop 9?
Yes. The Ciklik module works with PrestaShop 1.7.7 to 9.2: PrestaShop 1.7.7, PrestaShop 8 and PrestaShop 9 up to version 9.2, with PHP 7.2 to 8.4.
Which zip file should I download for my server?
In the latest GitHub release, take the ciklik-raw file followed by your server's PHP version, for example ciklik-raw-8.2.zip for PHP 8.2. For PHP 8.0, the file is named ciklik-raw-8.zip. The ciklik-with-addon files are meant for the PrestaShop Addons marketplace.
What changes between PrestaShop 1.7.7 and PrestaShop 8 or 9?
On PrestaShop 8 and later, you create new subscription frequencies directly in the attributes, and the module automatically hides other payment methods when the cart contains a subscription. On PrestaShop 1.7.7, a new frequency requires a database change and hiding other payment methods requires a theme change.
Where do I find the API token to enter in the module?
It is given to you when you create your PrestaShop space in Ciklik and is shown only once. If you no longer have it, open your site sheet in Ciklik (Settings, Sites) and choose the Create an API token action.
Can I install the module on a password-protected staging shop?
Not while the password blocks Ciklik: its servers must reach /api and /ciklik/gateway over HTTPS, without a password or a redirect. If the staging shop must stay protected, ask your hosting provider to allow Ciklik's addresses, listed in the My installation section.